Interactive Tree Shader
This is my first portfolio project for TGA, created in Unreal Engine and Houdini.
Inspired by Far Cry 2 and Lowenn Berthet’s burning tree project.
My original goals for this project were a lot loftier than what I managed to do.
The whole project shifted over to being only about getting hit reactions from a shader.
The project is based on a hierarchical numbering system written to the UV’s and read from the hit result.
The system uses a 0-1 gradient falloff for each branch which drives the deformation, and stores the parent branches falloff value at the point of intersection on the child branches to rigidly make them follow the parent in world space. I also store a pivot point and pivot Direction to control the bending origin and direction.
I procedurally create and write the attributes to Megascans trees in Houdini and sample the UV’s using blueprints and pass the data into a Material Function.
Numerical Hierarchy
I had an idea for how to write a tree hierarchy numerically to a float attribute. Making the root 0.1, the first branch from the root 0.11, second branch from the root 0.12, and then continuing on building the tree hierarchy like that.
Philip Bäcklund my classmate pointed out inaccuracies in reading float attributes, and suggested I store them as integers instead.
Unreal Materials use 32 bit floats so I can accurately have 7 children from the root. So I store my Hierarchy values as 1, 11, 111, 1111 etc.
I store this variable on the UV’s, and in blueprints I can find the Collision UV of the hit result and pass that value into the material.
I used this to compare the hit primitive UV’s to the UV’s on the tree.
(Enable "Support UV from Hit Results" in Project Settings is required for it to work).
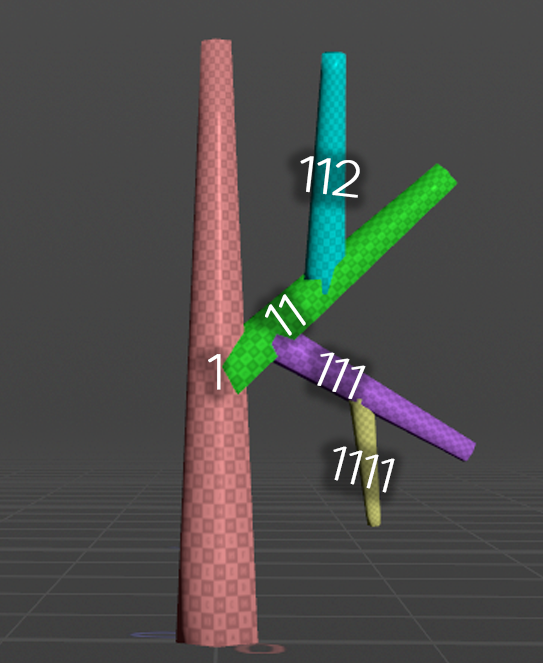
The tree Hierarchy as integers
Falloff Gradient for Deformations
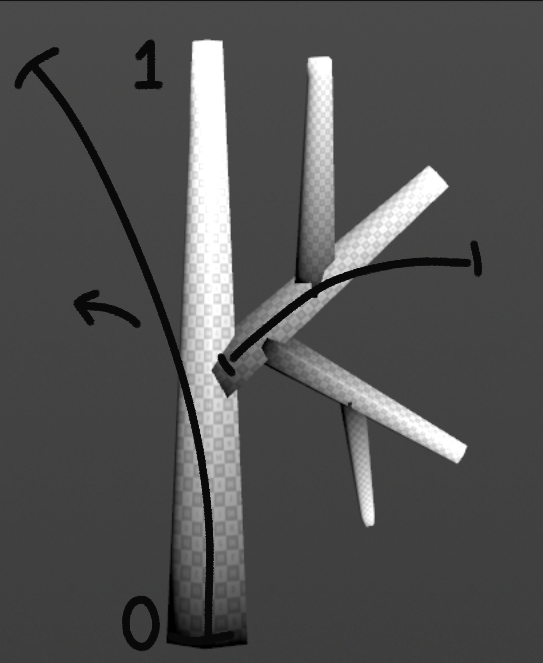
curveu and how it can be used to bend geometry
In Houdini I write a 0-1 falloff gradient to a curve, representing point positions along the curve, this is called curveU
I can transfer curveU from a curve to geometry as a vertex color to run the WPO offset.
Attachment Attribute
To move the child branches rigidly with the bending parent branch I need a float for each level in the Hierarchy, that’s where attachU comes in.
I can store the curveU value at the child branch point of intersection with the parent branch so they stick to the parent branch as it deforms.
So if branch 121 has an attachU value of 0.3, then all the children of that branch also have the same attachU value written to all of their vertices.
For the system to work I can’t use nanite as I need all 8 UV channels to store the data.
attachU used to rigidly follow the bending of the parent branch
Pivot Position and Direction
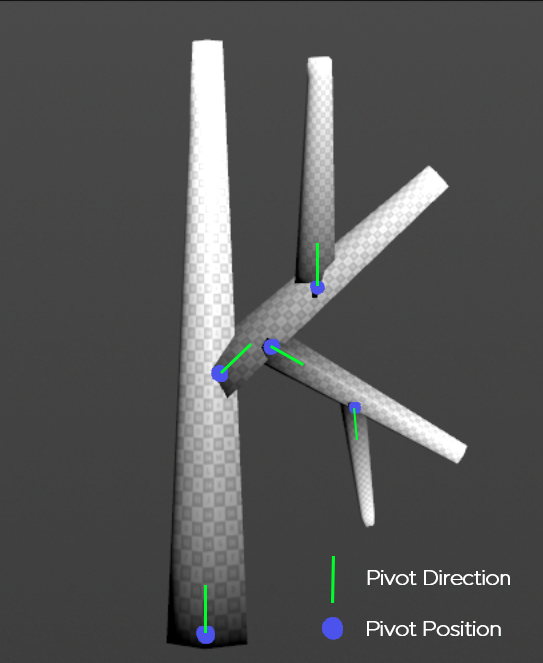
Pivot Position and Direction
Using the Unit Direction vector created from Unreal Engine’s Hit Result as the direction to bend towards and a Pivot Point stored as 3 floats on the UV’s to use as the deformation origin.
I still needed a directional vector for the pivots to point towards and I was running out of space on the geometry attributes.
I found out about Octahedral Encoding, a term that I had never heard of but it did let me store a vector as 2 floats with +-0.00005 accuracy. MAGIC.
Material Setup
After figuring out the concept got to work writing attributes manually on to the proxy tree so I could test the system.
I treat the Hierarchy kind of like a string which let me mask out parts of the geometry.
HitBranch: the hit branch UV value.
IsChild: If the hit branch is 12, then every UV value that starts with 12xxxxxx is a child of that branch. Masking out the descending hierarchy from the hit branch.
AttachLevel: This is the the level above the HitBranch, which masks out the value of attachU to read.
curveU I could read from the HitBranch
attachU: I could read from the AttachLevel.
Pivot position is the point the branch rotates around.
Pivot normal is effectively the up vector/axis.
HitDirection: is the direction the tree is shot from, fed from blueprints
HitStrength, a multiplier for the bending intensity.
Absolute World Position.
As time was short and I had a deadline to prove that the system could work I used ChatGPT.
After multiple prompts explaining the way the system was supposed to work, it spit out HLSL code that I could place in Custom Nodes in the material and connect everything together.
I intended to rebuild the material with nodes but I ran out of time.
To get lessen the Hit Reaction intensity on the trunk I created a height mask which made the tree’s react less when shot closer to the base.
Early stages of the bending and showing the masking of the branches.
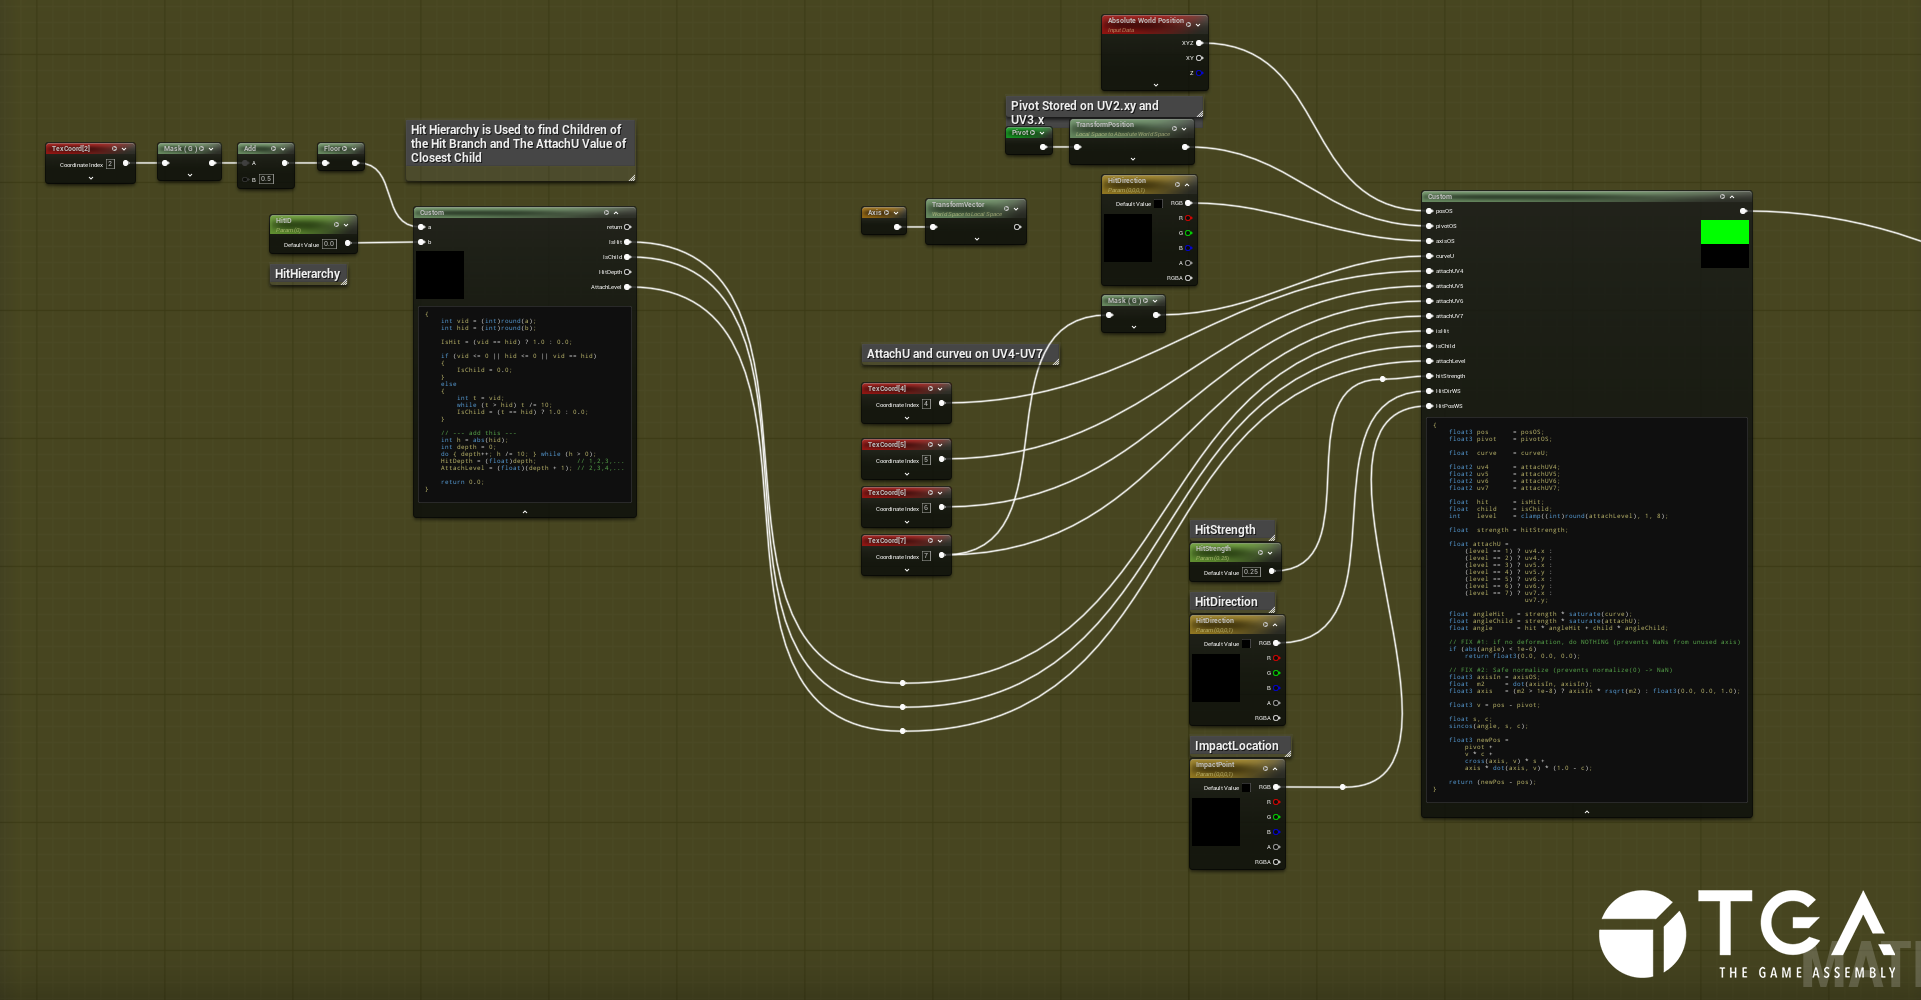
The material setup for processing the attributes
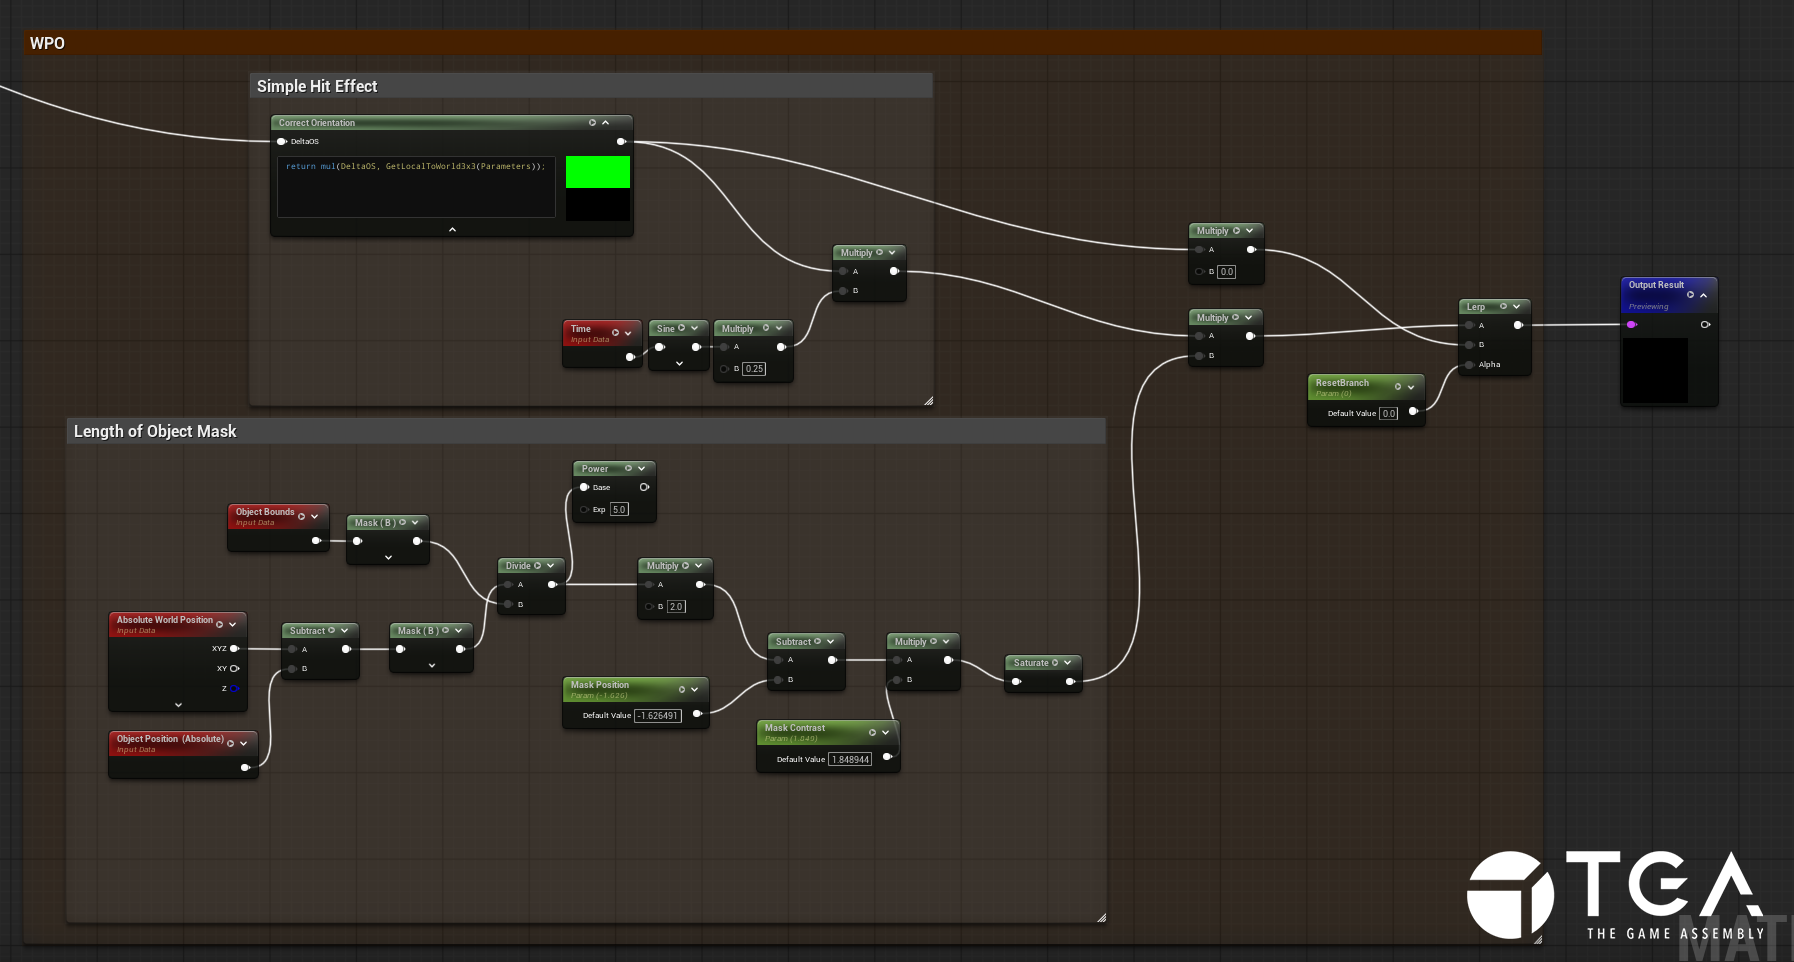
The setup for the height mask
Transferring to Megascan Trees
Now I had to figure out a way to assign all of the needed attributes onto an existing tree procedurally to make the system scalable.
I went for the easily accessible Megascans .
I split up the Megascans tree’s by materials to extract the trunk and branches
Extracting Curves and Creating Hierarchy
I used vdb_skeleton_curve by rpopovici on the SideFX Forums.
(I did not have good results with labs skeleton 3d and this project file enabled me to extract the curves I needed).Split the trunk curves further to ensure that they don’t have more than 9 child curves connected to it.
Each curve is split and assigned a random id value, then combined again.
Prompted ChatGPT to generate VEX code to rewrite the id values to the hierarchy setup I needed (because this was beyond my current VEX level and to save time).
CurveU and AttachU
Generate curveu for each branch, starting from the lowest part on Y (creates problems with larger trees that have hanging branches).
Generate attachU by sampling the point with lowest curveu value to the closest point on parent branch.
(If branch sits exactly in the middle of the parent the value is 0.5.Transfer attributes from curves to the Megascan trunk and branches.
Extracting Pivot Positions and Directions
I got the pivots by blasting away prims with curveu = 0, then extracting the centroid point from that geometry.
The normal of the pivot I got by blasting curveu = 0.5 and extracting the point from that and then calculate the direction of the pivot to that point.
Writing attributes to leaves
The leaf geometry from Megascans included small branches in some places which I isolated by grouping unshared edges, then I removed them and ran the branches through a loop.
since the branches were not manifold I could create a patch to close them, then I could extract the center point from that patch to get the bottom point.
In the loop I also created a seperate leaf group for each branch which I then transferred by proximity to all the leaves.
I then used the pivot to get the attachU value of the closest intersecting branch and transferred that value to all of the vertices in the leaf group.
Clean up and reassigning Megascans attributes
Now I have all the data I need so I clean up the geometry, delete groups and unneeded attributes and then reassign all the necessary Megascans attributes back from the original geometry.
I did have to separate the leaves from the branches and export them as seperate meshes so I could disable collisions on them.
I will add that there were a few wrangles I had ChatGPT write when the nodes in houdini I was used to using to did not accurately transfer the attributes over to the geometry, I used it mostly to use existing attributes as guides or masks to transfer the new attributes.
Once I imported the trees into Unreal they worked seamlessly with the existing blueprints and materials. And since I had the original Megascan attributes I could make the deformation material into a function and add it to the pivot painter setup in the Megascan Master Material. Giving me wind movement for free.
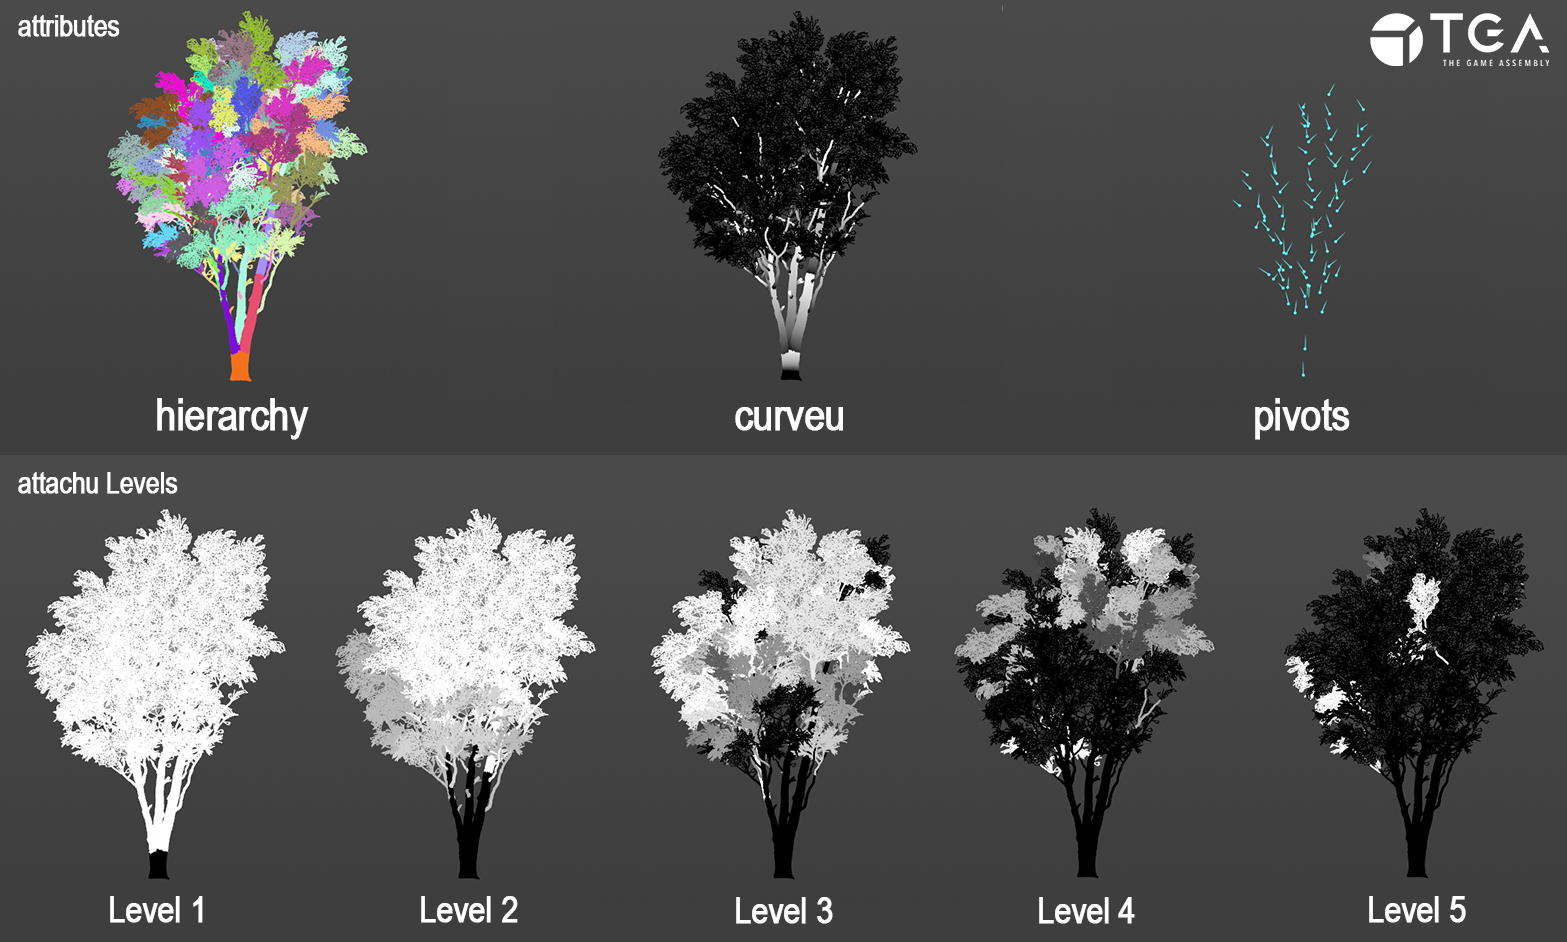
All the main attributes required to run the system
Since I was using Megascan tree’s I could not use the vertex colors, the alpha or the first UV set. So here’s how I store the data:
hierarchy = UV2.x
pivotPos = UV2.y and UV3
pivotNormal = UV4
attachU = UV5-UV8.x
curveU = UV8.y
Niagara System
I spawn some leaf sprites at the top of the tree, calculating the Z bounds in blueprints and using the max height as the location to spawn the system
There’s also a very subtle splinter emitter spawned at the impact location.
Once everything was working I ran a few more Megascan trees through the Houdini setup to show that the system is scaleable.
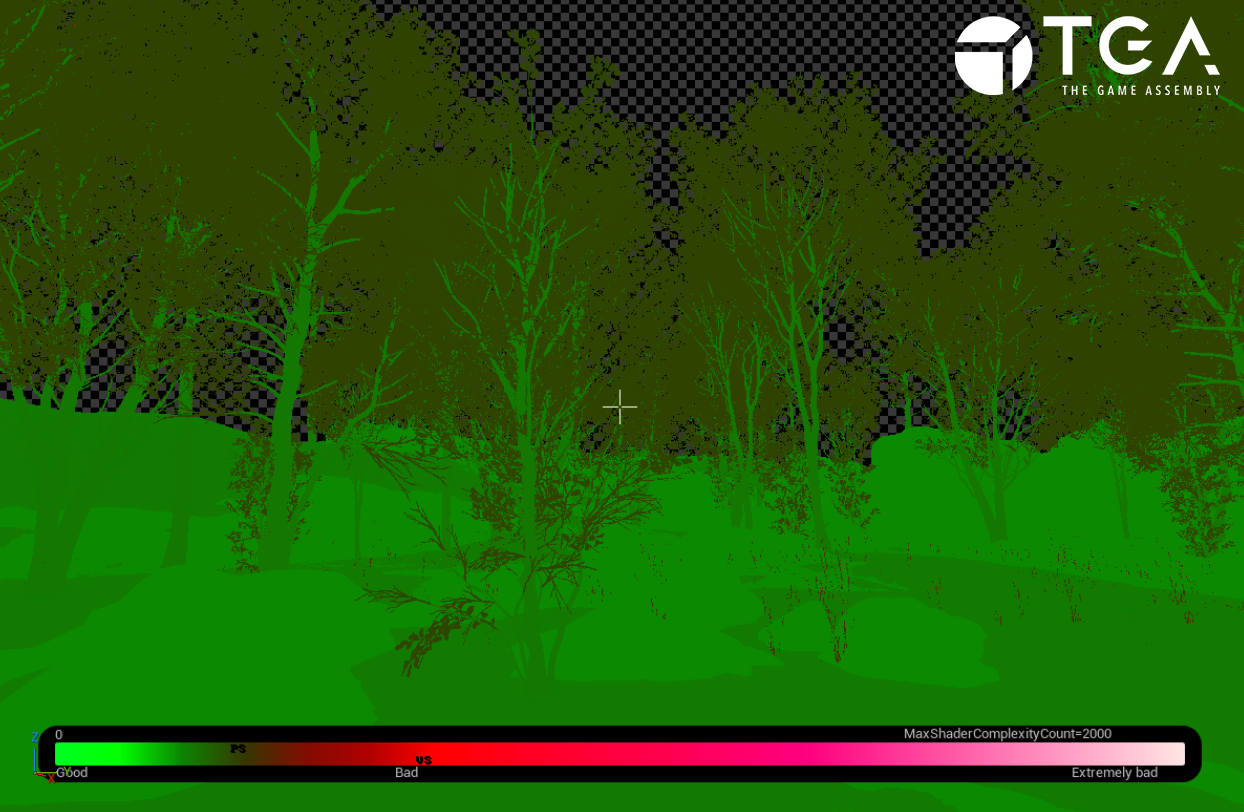
The system is very inexpensive to run, with most of the cost coming from Pivot Painter.
Chaos Tests
After getting the system working I really wanted to do a quick test with Chaos, which at this point I had no experience with.
I do the fracturing and chaos attribute creation in Houdini and export to unreal.
Since I can't access the UV's from a hit trace to the Geometry Collections meshes, I have to use a seperate non GC mesh. That only collides with traces and projectiles. I set that to be hidden in game.
I used a combined unfractured static mesh of the same tree and read the geometry attributes from that, it results in some inaccuracies with branch bending, with the base of the child branches moving a little away from the parent branch.
Another issue is that the collision is still active so shooting where a branch used to be will still collide with bullets.
Cut Content
I wanted to generate the trees in Houdini using L-Systems, have them be both burnable and breakable as well as have wind movement baked into the vertex colors.
I did none of that.
I started by making a simple tree proxy in Houdini and rigging it with Kinefx, my original plan was to use physics bodies for branch hit reactions.
After spending a full week on that and realising that the physics bodies I created in Houdini could not correctly be brought into Unreal (some research suggested it’s a current limitation of the KineFxtoUnreal node). Additionally after further research I found out that I could not use skeletal meshes as Geometry Collections which meant I could not directly make a skeletal mesh interact with Chaos Physics.
If I had more time
There’s a lot of polish missing and the system is held together by duct tape. So cleaning up the attributes, seeing which are truly necessary for the system to run smoothly would be my next step.
I would have measured the thickness of the branches and exported another float variable on to the geometry which would have worked in tandem with the HitStrength, making the thinner branches react more to the hits. I didn’t use all 8 slots for the attachU so there’s still space for other attributes. (depends on the size and complexity of the tree though).
Have a buffer for hits so more than one branch per tree could react at the same time.
I wanted to rebuild the HLSL code blocks with nodes but I ran out of time.
Overall I am very proud that it actually works and I really wanted to explore other use cases for the system, I think it could be used for other purposes.
Hit reactions for enemies or other assets
Mesh deformations for things like metal and plastic
Thanks for taking the time to read this :)